Sunday, July 1, 2012

Happy Birthday to you, Happy Birthday to the USA!

I cannot believe it is almost the 4th of July - this summer has absolutely flown by so far.  I used to feel like the 4th marked the middle of the summer, I am not sure why but as I get older it seems to be more of the start of the summer.  I am guessing a lot of you are either hosting a BBQ or attending one so I wanted to give you a few ideas of patriotic dishes you can make.  I haven't personally made any of these but they all look very tempting.
First let's start with some appetizers:
Sausage Stars
These look very easy and make 4 - 5 dozen at a time!

Buffalo Chicken Bites
These look phenomenal and they are baked!  At most parties the buffalo chicken dip is a hit - these are new twist to that.  You can prepare them ahead and then pop them in the oven when you get to the party.
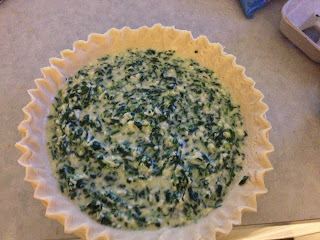
Raspberry Dip
When you see the ingredients you are going to think - what that looks like an odd combination but with so few ingredients and easy instructions I think you need to give it a try...at least once!

If you are planning on making a dip here is a way to really celebrate the 4th of July - you can use this technique with most dips.
 

Now on to dessert...I am thinking something patriotic.
Cupcakes in a Jar
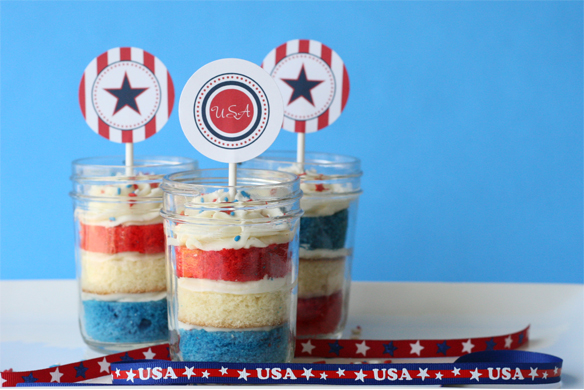
The best part of this recipe is that you can use either frosting and cake from scratch or from a can and box...you decide how hard or easy it is!

Red, White, and Blue Philly Cheese Pound Cake
red white and blue pound cake 2 300x209 Red, White and Blueberry Philly Cheese Pound Cake
Again these are fairly simple and will be refreshing on a hot evening.

Chocolate Dipped Strawberries
Red, White and Blue Strawberries
I cannot think of anything more simple than these.  Honestly who doesn't love chocolate dipped strawberries!
Recipe: http://itsybitsyfoodies.com/red-white-and-blue-strawberries/

And finally for some beverages...all of these have minimal ingredients

Watermelon, Blueberry Coolers

Lemonade Sparkler

Sangria

I hope these recipes have inspired you all to get out there and celebrate with good food and drink.

Until next time...Stay Creative!!

Tuesday, June 26, 2012

It's Shower Season!

No, no I don't mean rain shower season but for those of you in the northeast or Florida you probably thought that is what I meant.  I really mean wedding shower season - I know a wedding shower can be any time of the year but let's face it the majority of weddings take place in the summer/fall time so to me it is shower season.  A few weeks back a coworker of mine headed down the aisle however before you she did we had a little get together at the office.  For the get together I decided to make 'wedding' cupcakes.  What are wedding cupcakes?  Well I decided 'wedding' cupcakes were white cupcakes with white frosting but other than that I had no idea.  I decided to google it to see if there was someone else out there that thought the same thing as myself, and you know what there was!
I found an excellent recipe online with almond frosting.  I was a little skeptical at first because I had never made almond frosting but it was phenomenal.  I decided to go with a pink and white theme as those were the colors she was using and happened to have the perfect cupcake liners.
I had used these liners before and wasn't very happy with how the batter over took the colors in the liner.  I used them for a carrot cake cupcakes so the darker batter did not look very well with the liners but these were perfect.  Once I made two dozens cupcakes I was ready to frost them.  I dyed half the frosting in light pink and left the other half white.
For some of the cupcakes I frosted from the outside to the inside which makes the peaks.  I also frosted some from the center to the outside which makes a rose like pattern.  The back, left pink cupcake has the rose pattern which is flatter for those who may not enjoy frosting quite as much as the others.  One they were all frosted I was ready to load up my cupcake carrier.
Once I got to work and we were ready to celebrate I put a fake engagement ring on each cupcake for the final touch.  I am disappointed I didn't get a picture but I hope you can all use your imagination and pretend for me!
Below is the recipe I used for the cupcakes and frosting:
Ingredients for Cupcakes:1 box of Betty Crocker white cake
1 cup all-purpose flour
1 cup sugar
3/4 tsp salt
1 1/3 cups water
2 Tbsp canola oil
1 tsp vanilla extract
1 cup light sour cream
4 large egg whites

Preparation:
Preheat oven to 350 degrees
In large bowl or mixer add all ingredients and mix until everything is well blended
Place in cupcake liners almost 2/3 full
Bake for 18-20 minutes or until toothpick comes out clean
Cool completely before frosting

Buttercream frosting: adapted from Recipe Girl's
3 cups powdered sugar
1 cup butter, slightly melted
1 tsp vanilla extract
1/2 tsp almond extract

Preparation:
In large mixing bowl add all ingredients
Mix on medium speed with hand mixer for 5 minutes
Spread on cupcakes or put in piping bag
Decorates up to 24 cupcakes with piping bag

They were so good that a coworker asked me to make them again this week - we will see hopefully I will find an event better recipe.

Until next time...Stay Creative!!


Tuesday, June 19, 2012

What can I bring?

As we enter the season of cookouts, well at least in the Northeast, with each cookout you ask what you can bring.  I would say from personal experience 9 out of 10 times the host with say nothing or whatever you would like.  What to bring?  Well I have a pretty good cookie recipe that is easy and will really intrigue the other party goers.  As much as I would like to take credit for being the first one to try this recipe I will have to give the credit to my mom.  When I was last home she had made these cookies for a party and they were a hit so I figured I would give them a try.
I made them over the weekend and brought them to work to test on my coworkers.  I wasn't sure how they would be received but I told everyone to just try them before giving me the 'what' are these look.  Well they were a hit so here I am sharing with you the recipe.  You start by making chocolate chip cookie dough and add potato chips - yes potato chips.  I bought the cheap store brand plain potato chips and put handfuls of whole chips in a plastic bag, crumbled the cookies and added more.
Before I knew it I had 2 1/4 cups crumbled and ready to add to the dough.
I stirred in the potato chips after I added the chocolate chips to the dough and I had potato chocolate chip dough! 
I found the recipe online but I put a little 'Mom' twist on the cookies.  I made balls of dough and rolled the dough in the extra potato chips before I baked them.   My mom informed me she made hers like this to add a little extra crunch and salt.
After rolling each ball I placed the cookies on the baking sheet.  Be cautious when placing the cookies on the baking sheet as they do not stick to the tray and will slide around.  I learned this with the first tray as they all slid to one side.  I baked them following the directions and they were perfect.
Like I said before everyone questioned these but with one bite my coworkers were impressed.  They really liked the sweet and salty concoction.  This is the recipe I used:

Ingredients
1 cup butter
3/4 cup granulated sugar
3/4 cup packed brown sugar
2 eggs
2 cups all-purpose flour
1 tsp baking soda
2 1/4 cups crushed potato chips (I used Lays Classic Potato Chips)
1 1/2 cup semi-sweet chocolate chips
Directions
Preheat the oven to 375 degrees F.
In a large bowl, cream the butter and sugars until light and fluffy. Beat in the eggs. Combine the flour and baking soda and slowly add to the creamed sugar mixture. Mix well. Stir in the crushed potato chips and chocolate chips.
Drop by small spoonfuls onto an ungreased baking sheet. Bake for 10-12 minutes or until golden brown. If you are making large cookies you may want to keep them in the oven for about 14 minutes. Cool for 1 minute before removing to a wire rack to cool completely.

Remember roll the cookie dough in the chips before you bake them - adds a great twist!  Stay tuned for a white cake cupcake with almond frosting.  Perfect for those upcoming bridal showers!

Until next time...Stay Creative!!


Monday, May 21, 2012

Chicken, Lickin' Good!

I shared with you all a photo of a chicken dish my mom had prepared a month or so ago and promised to share the recipe.  Well I have had the recipe for a while now but wanted to wait until I made it to share it with you all.  My mom promised it was delicious but I actually hadn't tried it until now!  The picture on the recipe looks very involved and the outcome looks absolutely gourmet but I want to let you know it is not as complicated as it looks.
First I bought the chicken - the recipe calls for an organic 3 1/2 pound chicken and I wasn't sure how easy this would be to buy.  Well I walked away with a 7 pound whole chicken and after telling my mom I realized finding a smaller, whole chicken is difficult.  Once I had the chicken and the rest of the ingredients I was ready to go.  I made this on a 'school' night (aka midweek night) so you can take my word it doesn't take all day!
The recipe also calls for fingerling potatoes but my mom brought me some smaller potatoes that were different colors.  Have you ever had the Jet Blue Terra chips well that type of potato was in the mix and very tasty.  I am not sure how easy these are to find but if you can find them they are great.  I think they were called a potato medley and came in a bag.  Once I basted and stuffed the chicken with a lemon it was ready to bake.  I would caution that if you get a larger chicken I would stick to the cook time based on the weight of the chicken and not this recipe.
Once the chicken is done cooking you brush on the sauce you will make while the chicken is cooking then let it set and voila dinner is ready!  This chicken was huge and we had leftovers which always makes the next night really easy :)
I served it in the dish I baked it in as it was just me and my husband eating but when I cook this again it will be for more than two of us and I will make sure I serve it on a nice dish.  Overall it was very tasty and moist - the sauce really brings out the flavor.

Also I wanted to share with you a picture of my garden that I mulched yesterday.  The garden started 3 years ago with a few small hostas and a hydrangea and has grown into a jungle!!
I also recently received the bunny from my mom which I love!  I think with a nice bird bath I will have the perfect backyard, city retreat.  Stay tuned for another easy recipe I made this weekend.


Wednesday, May 9, 2012

More Flowers

This week I went to a flower class and had no idea what to expect.  I had come across the flower school online and so for my birthday I received a gift certificate from my parents for two classes.  This was my first class and I wasn't sure how exactly it was going to go since the website had the course name but no description.  The class I choose was called 'Flowers & Foliage' - what does that mean?  I wasn't sure either but now I know.
When I got to the class I saw hydrangeas (yay) and lilies (nay) and still was not sure what we were doing.  We all started with the instructor showing us examples of what she made with the materials and then we were left to work on our own.  I wish I had taken pictures but there were signs asking for cellphones to be turned off so being the good student I am I didn't want to get a bad rap! 
We started with wrapping the container they gave us with big leaves using these sticky dashes - these were extremely sticky and the leaves are holding strong.  The containers were black and silver so the leaves did the trick.  I was given two leaves and one was so big it was wider than the container but I made it work.  Next we put in the wet block and covered the diameter of the container with lemon leaves.  We then used one hydrangea to cover the bottom and built up from that.
The instructions were to use two stems of lilies and place them any way we wanted to and then we had some grass and these hollow green twigs that looked like bamboo (I forgot the name).  In the beginning the instructor demonstrated that these bamboo like stems could be formed any way with wire and they don't break.  However once you bend them the crease is permanent.  I wasn't sure what to think as I am used to several flowers in bouquets and this was very contemporary.
Once we were done the instructor judged each one but wasn't ruthless about it.  Some people in the class loved giving their opinions on all of them whether you wanted to hear it or not! 
I struggled with this arrangement a bit because it was contemporary and I didn't want it to be too symmetrical and in the end it worked out just not sure how I like it.  And here it is:
and another view...
As you can see it takes on a different look from a different angle - this was something I was really aiming for.  It is definitely not your typical arrangement but it is growing on me! I did want to let you know that one arrangement had the bamboo stuff sticking out each side and the instructor referred to them as bunny ears...ooops.
I also wanted to share with you a gift I recently wrapped.  I particularly like this one since it is so different.  I found peacock feather wrapping paper at TJ Maxx to start the pakage.  Then I was strolling in Michael's the same day and thought a peacock feather would be nice and they had them!  I used to some green ribbon I already had and voila I had a pretty package!
My mom was visiting this past weekend and used the paper too!  It is so fun and different - perfect for any occasion. 

Until next time...Stay Creative!!


Wednesday, May 2, 2012

Easy, Peasy, QuichE!

Recently I went to a friend's house and decided with another friend to bring lunch.   It was very last minute so I wasn't sure what I would make until quiche came to mind.  I had actually never made quiche before but after googling a few recipes I realized there were several different variations to the quiche recipe.  I found one that I decided I would use as a guide for my first spinach, cheese quiche.  First I started with sauteing onions with butter then added garlic and sauteed some more.
Next I defrosted the frozen, chopped spinach in the microwave.  I then removed the onions and garlic from the stove and put them in a bowl to cool.  Once the spinach was defrosted and drained I added the spinach to the onions and garlic and mixed it well.
The recipe then called for Gruyere cheese - I had never made anything with Gruyere so I wasn't sure what to expect.  When I got to the grocery store I realized I needed 1 1/2 cups shredded and the cheese was on the expensive side.  I had no idea how much a block would be grated but I learned that a block of cheese grates into a large amount!  I grated the cheese and added it to the spinach mixture.  I also added cheddar just because I had some.
Once this was combined I used my hand mixer to beat the eggs and milk.  Once the eggs and milk were well blended I added the egg mixture to the spinach.  The recipe says to put the spinach on the bottom of the pie plate and add the egg but I wanted to make sure it was all blended.   Prior to adding the mixture to the pie dish I 'made' the crust.  By made I mean I bought a Pillsbury pie crust in the refrigerated section at the grocery store.  I have made crusts a few times from scratch but for quiche this was pre-made crust was perfect.  
As you can see the filling didn't quite fill the dish.  I forgot my pie dish is a deep dish so next time I make the quiche I will just need to add some more eggs and milk.  I put it in the oven and waited...
Voila...
It is ready to eat!  The great thing about this recipe is you can add anything you want for the filling - just use the egg and milk base add your imagination and dinner is served. 

Spinach Quiche Recipe:
1 tablespoon unsalted butter
1/2 onion, finely chopped
1 clove garlic, minced
1 10-oz. package frozen chopped spinach, thawed and squeezed dry
1 1/2 cups grated Gruyère
1 9-inch unbaked pie shell
3 large eggs, lightly beaten
1 1/2 cups milk
Click to see savings

Salt and pepper
Pinch of ground nutmeg

  1. Preheat oven to 375ºF. In a small skillet over medium heat, melt butter. Add onion and sauté until translucent, about 5 minutes. Add garlic and cook for 1 minute longer, stirring. Transfer to a small bowl and let cool.
  2. Sprinkle onion mixture, spinach and Gruyère over bottom of pie shell. Beat eggs and milk together, season with salt, pepper and nutmeg. Gently pour into crust.
  3. Bake quiche for 40 to 45 minutes, until set and nicely browned. Remove from oven and let rest for 10 minutes.

There you have it - try it and I promise you will not be disappointed on how easy and good it tastes!

Until next time...Stay Creative!!

Thursday, April 26, 2012

Wreath take two

I have been seeing these 'deco wreaths' around a lot this year and decided to finally succumb to the craze and give it a try.  I showed you before my hydrangea wreath so I clearly don't need one for myself but I figured I could make one as a gift.  I started by googling ideas and quickly realized there were several YouTube videos out there to guide me but first I was off to AC Moore for supplies.  I was lucky enough to find all my supplies on sale...including the deco mesh and ribbon! 
As you can see purple was the chosen color for the wreath!  I bought a straw wreath which was kind of a mess when I took the plastic wrap off.  Next time I will definitely go for the foam wreaths instead.  I had to cover the wreath first so I decided to use the light purple deco ribbon.  I secured the end with a u-pin and started wrapping....
The ribbon covers up the straw and gives the wreath a sparkly nice base.  After watching one YouTube video I realized it isn't really an art because you can be as haphazard as you want and it won't matter.  I started by scrunching the mesh together and pinning the end to the outside.
(Disclaimer: as you can see I started with a different ribbon to cover the straw but there wasn't enough and it looked sloppy so I started over)
This is the first securing of the mesh - I found it easy to pin it to the outside and then inside and outside and so forth.  It was like you were making v's and the mesh is full on the loops.
You can see where I pinned it on the inside.  The mesh is about 18" inches thick so it really does a great job of covering the wreath with the loops.
Here is the wreath all done...well before I had some fun decorations to add to it!  I decided to add some flowers first.

I wasn't exactly sure where to put the flowers but I did know I had a wooden 'B' I wanted to add to one side so I placed the flowers on the other side.
Next I painted the 'B' in light purple.  I had the paint from another project so I was all set with the color scheme!
As I let the 'B' dry I added some more flowers, light purple ribbon, and some purple butterflies.  It sounds like a lot of stuff but I didn't plaster the decorations all over the wreath just in a few areas.  I glued u-pins to the back of the wooden letter with hot glue and was able to fasten it to the wreath.   Like I said before I am going to give the wreath away but I wanted to give you an idea of how it looked on a door!
The great thing about this wreath is that I was able to make the wreath for under $20 - I think it is a pretty inexpensive project when you can find the supplies on sale!  Another great thing about these wreaths is that you can make one for every season or holiday with different themes.  You can definitely do more conservative colors but for spring and summer I thought purple was fun.  Stay tuned for my easy quiche that even tastes good!

Until next time...Stay Creative!!