Friday, December 30, 2011

When Pigs Fly....


Last week my brother had a pig roast for his fiance's big birthday. This is all she asked for so 12 of us gathered a a local restaurant and indulged on the suckling pig. Everyone had a great time. In preparation for the party I made a flower arrangement for the table. I wanted to add a bit of color and fun to the table. I started with bunches of flowers from Trader Joe's, a vase I had, wet block, and greens from a local florist.  I started with the leave to mask the wet block then started placing the flowers one by one.

As you can see I am big on being symmetrical but wasn't completely...

After adding two lilies off center and some gold, sparkling tin-tin it was complete. Now on to dinner!

This was the pig - how fun!

No birthday dinner is complete without dessert. I wanted to make something pig related and after several searches on other blogs I figured out how I was going to make the pig cupcakes. I put together a few designs I saw online and came up with my own strawberry pigs because we all know how much pigs like strawberries!

I also wasn't sure how to bring them to the restaurant but I remembered I had cupcake boxes with matching cupcake tins and decided those were the best way to transport the cupcakes.

Now off to a New Year's Eve wedding!  More blogging to come in the new year. 


Until next time...Stay Creative!


Sunday, December 18, 2011

Busy, busy...

So I know I neglected blogging this week but I have a few very good reasons.  Starting with...
Yes I have been busy wrapping presents for Christmas.  Every night I have wrapped a few more and still feel like I have quite a few to go!  Hopefully I will finish tomorrow but as you have all seen it takes me a little extra time to wrap my presents...I add a bit of creative love ;)

I was also busy addressing our Christmas cards.  I ordered them last week and they finally came in so I got started on them right away.  They went out in the mail yesterday so everyone should get them just in time for Christmas.  I started with:
Yes that would be 175 Christmas cards, but don't worry I did order some extra ones just in case so if anyone would like one please leave your name and address in the comments section haha.  Off I went to stamp, address, and return address the cards!
My mom bought me Christmas stamps so this was the perfect reason to use them.  I stamped the front of all the cards with Christmas rubber stamps just to add a bit of personalization since I printed all the addresses on labels.
I also stamped the back of the cards - I used various stamps but I will show the snowman:
I then added the return address label over the seal and was all set...just 119 more to go!  In the end I mailed out 120 Christmas cards - all completed on a Friday night...a great sign that I am getting old!
As you can see only about 2/3 had stamps on them - I had to buy more as I only started with 90, I was a fool to think that would be enough!  Ok on to the next thing - buffalo chicken mac 'n cheese.  I have seen this on many menus but never tried it and wasn't sure where to start but I decided to just try and work it out on my own instead of consulting with a higher force - Google.  First I marinated chicken in some spices and hot sauce as I normally do when I make buffalo chicken wraps.  A lot of the recipes are for breaded buffalo chicken but I am not into the breaded or fried kind so I just cooked it in a pan.
Once the chicken was cooked I put it aside and boiled my pasta and sliced the cheese (VT cheddar of course).  I like to leave the cheese out for a little while on the counter because it makes it easier to cut.
Next up was making the cheese sauce - butter, flour, milk, and cheese - so simple yet a bit time consuming and tempermental!
Then I stirred, waited, stirred, waited....added milk...stirred, waited, stirred, waited, and then added the cheddar but instead of just cheddar I also added blue cheese.
I thought this might add a little kick to the cheese sauce.  Next up I mixed the chicken with the pasta then the cheese sauce.
In the end it came out really well - I have never had it before so I am not sure if it came out as well as it should have but it was on the table that night and every last bite was eaten!  Although that is pretty standard at our house :) 
This week my future sister-in-law is celebrating a big, big birthday...so stay tuned for a posting about the great wrapping job I did ;) as well as another baking project. 
Again I apologize for the neglection this week and hope to be back on track after the holidays!
Until next time...stay creative!!


Sunday, December 11, 2011

Don't forget your skirt!

Not sure if you realized when I blogged about the tree but there was no tree skirt!  Yes my poor tree has been sans skirt since last Sunday...until today!  I do own a tree skirt but unfortunately it didn't really go with the tree decor - it was rather traditional.  I decided to make my own because I couldn't seem to find green or blue tree skirt - who would have thought??  So today I made one.  I had seen directions a few weeks back on how to make one from a tablecloth and that is just what I did.  I looked for a week for a fun green or blue tablecloth but it was rather hard.  Today I came up this one and settled (our tree was getting cold at night)

After ironing the 70' round tablecloth it was time to start cutting and sewing.  I folded it into quarters and cut a quarter circle which once unfolded was a circle in the middle. 

 Next I cut a line from one edge to the center in order to put the skirt around the tree:

At this stage it looks just like a tablecloth with some cuts in it but I am not done.  I used a needle and thread to make gathers around the edges.  I used dark green thread (because that is what I had) and started stitching:

At first I didn't really think about how many stitches for each gather but once I made the first one I realized  needed to make four stitches on the top and three underneath.  Once the stitches were in you pull the thread tight and tie a knot to secure the thread and make the gather:

I decided to just eye it and try to equally space the gathers out.  For a project like this you don't have to be precise but you can always measure if you would like.

You can see above the two gathers - I continued stitching and put gathers around the entire skirt.  Once I was done and made sure the thread was secure, it was time to put it on the tree:
This was so easy and only cost $10!  Eventually we will get a real tree skirt but for now this one will do!  Now it's time to wrap the presents and put them around the tree.

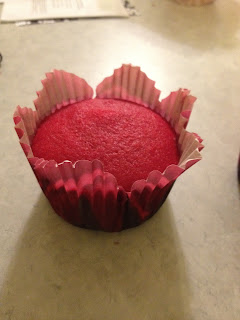
Also this weekend I brought red velvet cupcakes to a get together with some girls.  I was lucky enough to have my mom bake them for me last weekend and all I had to do was frost them!  Truth be told I have had some issues making red velvet cupcakes in the past and need to get back on the red velvet horse again real soon because these are my absolute favorite.  Usually we use a butter cream frosting but since I wanted to frost them with a bag and tip I used cream cheese frosting.  The cream cheese frosting was so easy ( 16 oz cream cheese, 1 stick of butter, and 2 1/2 cups of confectionery sugar) doesn't get any easier than that!
I started with the defrosted cupcakes...my mom used cool flower petal cupcake tins which were really pretty. I will have to say usually decorative tins end up not looking as nice because the batter darkens them and the design is hard to see but these were nice because of the petals:
I thought I had wider decorating tips than I had but I made do with the ones I had.  I tried just the star tip and the plain circle tip:

These look pretty good but they were missing a bit of holiday spirit - red and green SPRINKLES!!
And there you have it - Red Velvet goodness.  I know I still owe you the buffalo chicken mac 'n cheese post and I will share it this week I promise.  I can't keep up with all the projects.  On a sidenote my husband fixed our alley door today (yay!) but I assumed no one would really appreciate a post about that :)

Until next time...Stay Creative!!


Tuesday, December 6, 2011

The holly bears the crown...

I often thumb through magazines looking for ideas either to decorate the house or to make crafts.  My favorite magazine is Pottery Barn because usually the decorations and furniture are highly overpriced and it always presents a challenge to replicate the 'PB' look.  Recently I came across a holiday decoration that I really liked but with a $200 price tag that wasn't happening! 


So I started to visualize how I could make this and also sent my mom a picture of it and she started helping me gather the supplies.  In fact my mom got me everything but the burlap and twigs (I do have the best mother) so I was ready to put together this decoration.
Faux holly and berries + twigs + styrofoam cone + burlap + twigs + hot glue = one sophisticated decoration!

Now it as time to put the project together.  I started with covering the styrofoam cone with the burlap using hot glue.  The styrofoam did melt a bit but not enough to affect the way the burlap fastened to the cone.

Once I covered the cone I needed to glue a few taller twigs that would be higher than the holly and berries as the twigs were going to be the highest point of the arrangement.

Next I had to strategically place the holly and berries. I had three different types of holly and berries so I needed to space out each variation.  I secured the twigs and holly to the burlap using hot glue as well.  It was important to hold down the stem with the glue until it dried or else the stems wouldn't stay attached to the burlap.

Once I attached all holly and berries it was time to cover the base with the remaining twigs.  This proved to be the most difficult task in creating this arrangement.  The twigs I purchased were not all straight so it was hard to attach those to the burlap.  I actually removed a few strands of burlap and tied it loosely around the top of the cone to hold the twigs in place so I could glue them evenly around the burlap covered cone.

After all the twigs were attached I tied 4 strands of burlap tightly around the cone towards the top to secure the twigs and holly as well as replicate the one originally seen in Pottery Barn.
And there we have it folks...for a small fraction of the cost!
(I will explain the plates on the wall in the background in a later post - an idea from PB as well)

Until next time...Stay creative!!


Sunday, December 4, 2011

Oh Christmas Tree, Oh Christmas Tree

Yesterday we went to a tree farm north of Boston in search of our Christmas tree and it proved more difficult than we thought.  All together our group needed two trees and after going to a few areas of the farm none of the trees met our standards.  The trees were either too tall, too bare, or too skinny - we were in search of voluptuous trees!  Finally after the third area we found trees...yay!  I was about to give up and buy a pre-cut tree but at last we found 'the one'.  Here's a few pictures of our search for the perfect tree:
I was pretending to cut a tree when we thought we weren't going to find one we wanted to at least appear to have had the experience of cutting our own tree!
The tree!  My husband is sizing up the tree - I thought for sure it would look bigger once we got in the house but it didn't.  Aside from the height the tree shape is perfect.
Loading the tree with a little help from our friends - back to Boston we all go.

My husband was nice enough to drop me off at the mall to meet my mom and then he took the tree home.  When I got home it was all set up and let me tell you it did not look very big :(  We have high ceilings and it just didn't fill the space but once it was decorated it was a lot better.
Here's our 'naked' tree waiting to be decorated.  Now it was time to decorate it with flowers, butterflies, bows, and a star.  I previously purchased green floral picks, blue picks, silver picks, and blue ribbon to decorate it.  Not your typical tree but with very few traditional ornaments I wanted to do something fun.
This is the beginning of the tree without bows and the star...not looking too bad but could use some more color.
Close up of the flower pick
Butterfly pick

And now I present to you our 2011 Christmas tree:
It is a very fun tree and as you can see our reindeer is part of the theme.  We affectionately named him 'Skippy' as he has one short leg - poor reindeer!  My husband needs some time to get used to the tree but I know it will grow on him.  I hope everyone else enjoyed decorating their tree as much as I did.

Up next is another holiday decoration I made based on a Pottery Barn decoration and buffalo chicken mac 'n cheese.

Until next time...stay creative!!