Tuesday, January 31, 2012

Do you have too many shoes?

I was bopping around in HomeGoods the other day and came across a hanging shoe organizer.  You are thinking so what?? Well I had seen this real neat idea using a hanging shoe organizer and decided to try it out myself.  I started with the door to the laundry 'closet':
Then I added the $10 shoe organizer I bought at HomeGoods:

I know you are all thinking ok so she bought a shoe organizer for the closet door which she will now show us how it holds her shoes? 

That is the logical thought and actually sounds like it would clear up some room on the bottom of my bedroom closet but in this scenario I didn't use shoes.  Looks nice, right?  However instead of shoes I decided to use this show organizer for cleaning supplies! 

I am a little too excited about how well this works and how much easier it will be to find the supplies.  Underneath the sink also looks a whole lot cleaner.  I will caution though if you do this and plan on your roommate (either it be a friend, child, boyfriend, girlfriend, or spouse) cleaning you need to show them right away where it is because you don't want to come home to a dirty house and a confused (insincere)look. 

Until next time...Stay Creative!!


Sunday, January 29, 2012

Valentine's Cookies!

I came across a Valentine's cookie recipe and wanted to share it with you before February 14th in hopes that some of you would like to make them for the holiday as well.  I decided to give them a go this weekend to see how hard they were or if they were as good as they look.  The recipe looked simple with very few ingredients which made it even more appealing.
First I started with the batter which consisted of strawberry cake mix, crisco, and eggs (3 ingredients - doesn't get any simpler than that).
The batter was thick and not too sticky which made forming the cookies pretty easy.  In order to make the cookies you need to roll two balls for each cookie.  I found it best to roll two oval balls:
Next you squeeze the bottom together to form the bottom of the heart.  I then shaped the cookies a bit more into hearts.  My first attempt I used two round balls but found I didn't get a very defined heart shape.  Shaping of the hearts was the most time consuming part of the recipe.
A little more forming and the hearts were all set.
Next I put them in the oven and crossed my fingers that pink, round blobs wouldn't come out of the oven...
Not too bad, look like the recipe picture so I am on the right track.  After baking all of the cookies it was time for the cream filling.  Again the filling was only 4 ingredients (butter, cream cheese, vanilla, and powder sugar) and took no time to whip up.
I frosted one side of the cookie with a thick coat and used another cookie to top it off. 
I am happy how they came out but will say the recipe only yielded about 10 cookies so I think next time I need to make smaller balls as I had a lot of frosting left over.  I highly recommend making these, they are so easy and my personal taste tester gave them several thumbs up!
For the complete directions and recipe go to: http://thirtyhandmadedays.com/2012/01/valentine_cookies/

Do any of you struggle with finding your cleaning supplies as it is all in a pile under the sink or in a cabinet?  Well stay tuned because I have the perfect solution!

Until next time...Stay Creative!!


Wednesday, January 25, 2012

I say VASE, you say VAWWWWWWS

I am back up and running, somehow I figured out another way to get the pictures uploaded.  I probably won't be able to do it again though.  On to the post of the evening...vases...painted vases.  I came across directions on Martha Stewart on how to paint a vase and decided to give it a try.  I have a lot of cheap vases around the house because well I am really loved and get flowers a lot!  Ok that isn't all true but I do get flowers sent to me from mom or husband and always hold on to the vases.  I started out with a small vase I actually got free from Crate & Barrel:

Next I went to the craft store and bought a few paint colors, paint brushes, and tape in order to make straight lines.  I bought regular paint that on the back indicated it was good for glass surfaces - I believe it was $1.20/bottle.

After washing the vase with warm, soapy water, drying it and wiping it down with rubbing alcohol to ensure no oils or residue was on it I was ready to start painting.  Not so fast - since I don't trust my painting skills I used tape to make straight lines.

The lines look pretty good, right?  It was actually very easy to do but next time I am going to try and just paint free handed.  I picked three colors and decided to start painting.

As you can see I didn't stay in the lines very well!  I would caution when doing this not to use too many coats as the paint gets thick and it makes it hard to remove the tape without ripping the paint as well.  I found it very hard to paint the dark purple - for striping I would stick to lighter colors.  Once I removed the tape I baked it in the oven at 350 for 30 minutes.  The baking sets the paint and keeps it from rubbing off.  I didn't get a picture of just the vase before arranging the flowers but you can see it here.

After buying $10 worth of Trader Joe's flowers my vase was all ready! 


Flowers came out pretty good and were so easy!  This would make a great hostess gift with an inexpensive vase they can use over and over again.  You can also have your children finger paint one and ship it off to grandma's with flowers.  This is so simple I hope you all get a chance to try it and if you don't have vases lying around the house TJ Maxx or HomeGoods usually has them for under $4.  Happy painting and flower arranging - two talents in one.

Until next time...Stay Creative!!


Damn technology!

I have a post ready to go but for some reason I can't upload my pictures from my email - I am very frustrated and was hoping it would fix itself.  No such luck!  I suppose I should now learn how to blog via iPad :)  Cross your fingers I will be back blogging tonight.

Saturday, January 21, 2012

Yummy in my tummy...

First of all I realized when I looked back on my post about the pig roast I didn't post the correct picture of the arrangement I made for the table.  I posted the picture of it with only a few flowers so I really hope those reading my blog didn't think it was the final arrangement!  If you did think so and thought it was nice well then the final one will blow you away :)
Ok now that I posted that I feel better about my flower arranging skills being out in the public.  On to the real subject matter: appetizers.  This week I hosted book club and wanted to try some new recipes so after Googling a bit I decided on three recipes: Mediterranean dip, pizza puffs, and maple brie pastries.  I followed the 'rules' for 2 of the recipes however the third I made on my own using what ingredients I could find.

Mediterranean Dip
This is a layered dip with roasted red hummus, sour cream, mayonnaise, cheese, olives, roasted red peppers, banana peppers, tomatoes, and feta cheese.  I started with spreading the roasted red pepper hummus on the bottom of plate.  I used a plate similar to a pie dish however I believe the dip could be made in a 9 x 13 plate as I seemed to have excess ingredients.
Next I mixed the sour cream, mayonnaise, cheese, pesto, garlic powder, and onion flakes.  The recipe calls for red onion as well but since this is such a strong flavor that some people don't like I did not include it. 
The recipe called for olive oil mayonnaise but I had light mayonnaise already and decided to use that instead - not sure if it made any difference as I enjoyed the dip.  After mixing all ingredients together it was time to add the next layer to the dip. 
I then added the olives, roasted red peppers, banana peppers, feta cheese, and oregano.  Again the recipe called for tomatoes as well but I forgot to buy those (oops) and left them out.  After thinking about it I am not sure the tomatoes really add anything to the dip.
I served the dip with tortilla chips, celery, and carrots - I think pita chips would be a great dipper too! 

Mediterranean Layered Dip

  • 15 oz. roasted red pepper hummus

  • 16 oz. sour cream

  • 1/4 c. olive oil mayonnaise

  • 1/4 c. red onion, chopped

  • 1/2 t. garlic powder

  • 1/4 t. onion powder

  • 2 T. basil pesto

  • 1/2 c. shredded mozzarella

  • 1/4 c. roasted red peppers, chopped

  • 1 medium tomato, chopped

  • 1/4 c. banana peppers, chopped (avoid seeds)

  • 1/4 c. sliced black olives

  • Crumbled feta cheese

  • Dried oregano


  • Directions:
    Spread hummus on a platter. Mix sour cream, mayonnaise, onion, garlic powder, onion powder, pesto and mozzarella. Spread over hummus. Layer red peppers, tomato, banana peppers and olives. Sprinkle feta cheese and dried oregano on top.

    Pepperoni Pizza Puffs
    Next I made pizza puffs which were very simple AND delicious.  It is a mixture of flour, egg, baking powder, cheese, and pepperoni sprinkled with Italian seasoning and baked in mini muffin tins.
    Once they were baked I served them fresh out of the oven with marinara:
    These were great as well.  Jeez I really toot my own horn but it really just means I can follow directions!
    
    Pepperoni Pizza Puffs

    3/4 cup flour
    3/4 teaspoon baking powder
    3/4 cup milk
    1 egg
    1 cup shredded cheese (I used cheddar and monterey jack)
    1/3 cup pepperoni, chopped into small pieces
    Italian seasoning
    Marinara sauce

    Directions:
    1. Grease a mini muffin pan with nonstick cooking spray.
    2. In a large bowl, combine flour, baking powder, milk, egg until batter is lump free. Stir in cheese and pepperoni bites Spoon batter into the prepared mini-muffin cups about 2/3 full. Sprinkle Italian seasoning on top.
    3. Bake in an oven preheated to 400 degrees for 15-17 minutes. Serve while warm with a side of marinara sauce for dipping.

    Maple Brie Bites
    And finally I made maple brie pastries - this is where I made my own recipe.  I originally saw a recipe for honey walnut and brie tartlettes.  I could not find phyllo shells anywhere, the funny thing is I had them in my freezer from 2008 and just threw them out - they were definitely past their time but I cannot recollect where I got them.  I purchased pastry dough from Trader Joe's which comes two sheets to the box.  After thawing out one sheet of pastry dough I cut squares and put one square of brie on each pastry square.
    Next I came across maple walnut cheese topping in the gourmet cheese section of the grocery store and decided to add this on top of each square.
    I then baked the bites and served them straight out of the oven.  I apologize that I don't have any pictures of the finished product but they were good.  I ate the leftovers for dinner last night - reheated the bites in the microwave and they were good to go.
    Maple Brie Bites

    1 sheet of pastry dough (thawed)
    12 oz brie cheese (rind removed)
    Maple walnut cheese topping (made by Summer Fresh)

    Bake at 400 degrees for 15 minutes - keep an eye on these as they can burn fast so I would start with 10 minutes in the oven.

    I really hope you enjoyed these recipes and will be able to use them as well.  If I see you for the Superbowl next weekend there is a good chance you may get to try some of these recipes.  It is a snowy day in Boston so that leads me to think there is crafting in my near future.

    Until next time...Stay Creative!


    Tuesday, January 17, 2012

    Bookmarks that go oink!

    Ok so tonight I am going to share with you another children's project or something you can make for a child...good for all age groups!  Once again after way too many hours on Pinterest I found very cute bookmarks.  Hopefully some kids are still too young for Kindles and Nooks or else this project is a bust and I will need to get into the 21st century!!  These bookmarks are great because you can make any animal or design you want - let your imagination run wild.  I decided to make a pig based on the paper I had at the house. 
    I started with pink, sparkly paper and drew 3 2 1/2 inch cubes that look like this:

    I have a scoring board so it made it very easy to make perfect squares.  Next I added two diagonal lines down the middle of the two outside boxes:

    Once the lines were all drawn I started cutting the bookmark:

    If you are making multiple bookmarks it is good to use a thicker paper first to make a template first which can be used to trace and make multiple cutouts.  Next you will need to fold along the lines towards the whole square so each side overlaps.  Now secure the top flap to the lower flap with glue - leaving the area between the overlapping flaps and the square unglued.

    Now you have the head....but it isn't complete without a pig nose...

    ...eyes, ears, and a book!

    How cute are these!  I also made a duck:
    I wanted to share these with everyone because I thought they were an easy projects and encourage reading - what's better than that!  I also have book club this week so books were on my mind.  Stay tuned for some great recipes I will be testing out for book club.

    Until next time...Stay Creative!


    Tuesday, January 10, 2012

    Will you be my Valentine?

    This past weekend I was looking on Pinterest (best website) for project ideas and came across several valentine's that kids can make.  I thought what a fun idea and so I recruited a 7 year old to make her own valentine's.  I promised to make the mock-up one for her to follow as well as provide her with the instructions and supplies list.  I hope she has fun making them! 
    After looking at several Valentine's I picked one and off to Michael's I went to get the supplies.  But first here are some of the ideas I came across:
    or
    (not sure if these are safe for 7 year olds?)
    or
    In the end I settled for this one:
    I wasn't exactly sure what supplies I would find at Michael's but decided if I looked hard enough I would find the right materials.  After being at the store a few minutes I found everything I needed and most things were on clearance or in the $1 bin!
    I found white, round, scalloped cards so I decided to add some color.  I also found pink and white zebra paper on clearance that I would be able to print the saying on.  The 7 year old who is making these is a bit sassy so I figured the zebra print would suit her ;)  After printing the front of the card and trying my best to replicate the font I was able to print 4 on each piece of paper.
    Then I had to cut each saying out in a circle as the cards I bought were circular - I wasn't sure how I was going to cut a perfect circle...then the light bulb went on!  I used a drinking glass to trace a circle, it was great because I could see through the glass and tell if it was center.
    Next I cut out the circle:
    Now it was time to put the circle on the card.  I found a pack of 8 cards for $1 - not bad!  I glued the paper to the middle of the card and added two felt hearts for decoration.  The original Valentine was just a flat piece of paper, similar to a coaster, but I thought these were actually better because you can put them in the envelope and sign in the inside of the card.
    Now it is on to making the bracelet.  I picked up girl colors but I am thinking the boys in the class may not enjoy these colors:
    In order to braid the bracelet I reverted back to fifth grade and decided to safety pin the end of the string to my jeans.  Does anyone remember that trick?  I was laughing the whole time I was braiding it realizing how great that trick really is!
    After the bracelet was made and two holes were punched in the card it was complete:
    The card opens like a regular card and can be signed by the giver.  I chose these Valentine's because I thought both boys and girls would like these and it is also a good project to spend a few evenings making.
    I hope you all liked the card ideas and maybe some of you will even try one of these ideas.  Also check out Pinterest - your life will not be the same!!

    Until next time...Stay Creative!


    Sunday, January 8, 2012

    I'm back....

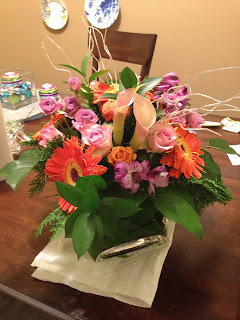
    Ok so after the holidays, a wedding, and traveling for work I am back and hopefully ready to attack crafts:)  First I want to share with you a few pictures from my brother's NYE wedding.  The flowers were absolutely gorgeous and were so fun!
    This was the bride's bouquet - so pretty and simple:

    The centerpieces which were on the tables and the bar:
    This was a great mix of calla lilies, orchids, and carnations all arranged in a martini glass.  
    My favorite centerpiece was the gift table arrangement:
    Add a lobster and trap for a little New England flare!  I wonder who is drinking out of that glass now??

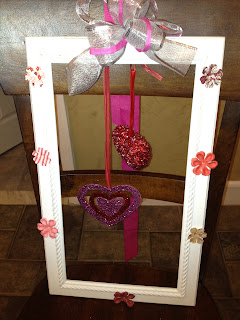
    Now on to my project this weekend.  Remember a few posts back I made a Christmas frame for the front door with ornaments well I decided to make one for Valentine's Day since I have very few Valentine's Day decorations.  I had an extra frame I bought a few months back so now was the perfect time use it.  I gathered all my materials - I wasn't sure if I was going to use them all but wanted to make sure anything red or pink that I had I pulled out of the closet:
    I started with the bow and frame:
    I had the silver bow left from Christmas so I added pink ribbon to go with the Valentine's theme.  Next I added the decorations I bought from Michael's.  I was hoping they had red Christmas ornaments left over but I think I was a week or two too late.
    The frame looked a bit plain so I added some paper flowers I picked up today.  The pack of flowers were only $1 so you can't go wrong.
    I am happy how it looks and now the door isn't so lonely!
    My husband asked if I was really putting it on the door and I asked if he was embarrassed and he told me yes...well it is now on the door.

    Next up homemade Valentine's Day cards for kids.  I have several ideas and will even show you one I made as a mock-up for an 'almost' seven year old who will be making them for her class. 

    Until next time...Stay Creative!!