Thursday, April 26, 2012

Wreath take two

I have been seeing these 'deco wreaths' around a lot this year and decided to finally succumb to the craze and give it a try.  I showed you before my hydrangea wreath so I clearly don't need one for myself but I figured I could make one as a gift.  I started by googling ideas and quickly realized there were several YouTube videos out there to guide me but first I was off to AC Moore for supplies.  I was lucky enough to find all my supplies on sale...including the deco mesh and ribbon! 
As you can see purple was the chosen color for the wreath!  I bought a straw wreath which was kind of a mess when I took the plastic wrap off.  Next time I will definitely go for the foam wreaths instead.  I had to cover the wreath first so I decided to use the light purple deco ribbon.  I secured the end with a u-pin and started wrapping....
The ribbon covers up the straw and gives the wreath a sparkly nice base.  After watching one YouTube video I realized it isn't really an art because you can be as haphazard as you want and it won't matter.  I started by scrunching the mesh together and pinning the end to the outside.
(Disclaimer: as you can see I started with a different ribbon to cover the straw but there wasn't enough and it looked sloppy so I started over)
This is the first securing of the mesh - I found it easy to pin it to the outside and then inside and outside and so forth.  It was like you were making v's and the mesh is full on the loops.
You can see where I pinned it on the inside.  The mesh is about 18" inches thick so it really does a great job of covering the wreath with the loops.
Here is the wreath all done...well before I had some fun decorations to add to it!  I decided to add some flowers first.

I wasn't exactly sure where to put the flowers but I did know I had a wooden 'B' I wanted to add to one side so I placed the flowers on the other side.
Next I painted the 'B' in light purple.  I had the paint from another project so I was all set with the color scheme!
As I let the 'B' dry I added some more flowers, light purple ribbon, and some purple butterflies.  It sounds like a lot of stuff but I didn't plaster the decorations all over the wreath just in a few areas.  I glued u-pins to the back of the wooden letter with hot glue and was able to fasten it to the wreath.   Like I said before I am going to give the wreath away but I wanted to give you an idea of how it looked on a door!
The great thing about this wreath is that I was able to make the wreath for under $20 - I think it is a pretty inexpensive project when you can find the supplies on sale!  Another great thing about these wreaths is that you can make one for every season or holiday with different themes.  You can definitely do more conservative colors but for spring and summer I thought purple was fun.  Stay tuned for my easy quiche that even tastes good!

Until next time...Stay Creative!!


Monday, April 23, 2012

Not so plain wall...anymore

A few weeks back I had a day off during the week and was able to catch the Nate Berkus Show.  I really enjoyed the show but I think it is being cancelled...not sure why though.  Anyhow he featured a girl from Chicago who decorated her small living space with odds and ends and even art she created herself.  She made pieces of wall art from two canvases, paint, and felt...naturally I felt inspired.  I started with two canvases and spray paint.  I had green spray paint the color I was going to paint the background so I figured that would be easier than painting with a brush...I was being lazy!
Next I started painting the canvases.   I quickly noticed the paint was creating a pattern as I sprayed and moved the bottle, a pattern I liked.
After I sprayed a bit more to even out the pattern I let the canvases dry.
As you can see once the canvases dried the pattern was more distinct and added some texture.  Next up was cutting felt out to create flowers.  I started with cutting out patterns for the flowers from thick paper.  The flowers were supposed to be layered so I needed 5 or 6 layers per flower.
I then started cutting and layering and cutting some more.  After cutting a few layers I realized it was easier to just cut the flowers free hand and let each one be a little different.  I decided to use brown felt for the flowers.  The pictures on the show were gold with white flowers which looked very elegant in the living room.
This is the up close of one of the flowers.  I made about 9 more and started placing them on the canvases.  I think I looked at the canvases for a week straight trying to figure out where to glue the flowers.  I used hot glue to secure each layer and used hot glue to affix the flowers to the canvas.


Here they are on the wall...it is hard to see how they bring the room together as the room isn't big enough to get the other colors in the room but I am happy with how they came out.  I think in total they cost less than $15 as I had some materials already.  I wish I could find a picture of the original ones I saw as they were awesome in the room. 
Next up I have a really easy quiche recipe as well as another fun
wreath.

Until next time...Stay Creative!!

Monday, April 9, 2012

Another holiday over...

I wanted to share with you all a couple things from this weekend.  My husband and I entertained our families on Sunday and it was a lot of fun!  It actually wasn't too much work for me as my other half did a majority of the cooking but I did do some flower arranging and baking.  Let's start with the flowers.  I had seen an arrangement on Pinterest which I really liked and had to try.  I wasn't sure how it would come out - looked simple but who really knows until you try.

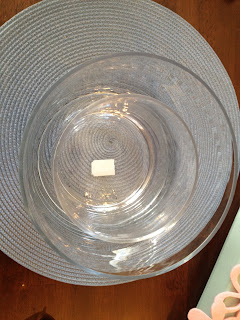
I started by pulling out all my vases to see if I could use them for this project.  I needed two vases, a big one and a smaller one for the inside.  The smaller one is for the flowers and the space between the two would hold the candy.  After I realized I didn't have a big enough vase I looked high and low for a square or round one and finally found a round one and it was perfect.
Next I started filling the bottom with jelly beans then a layer of peeps and another layer of jelly beans.  This was easier than I thought it was going to be - the hard part was getting the first layer of jelly beans level.  I didn't do a great job but live and learn!  The peeps I bought were in rows of four and the vase fit 16 peeps perfectly.  It was very easy since they were attached.  I also used two bags of jelly beans, one bag for each layer.
Looks pretty good but I will warn you the next part is harder.  I bought a few bouquets of flowers at Trader Joe's.  I really like Trader Joe's flowers because they are inexpensive and you can buy bunches of one type of flower (not just arranged bouquets).  So now it was time to arrange the flowers however first I had to put water in the smaller vase.  A piece of advice use a watering can to fill the vase or else you will get water in where the candy is and it will be a hug mess.

I started arranging the flowers using bright spring colors...yellows, pinks, and purples.  Arranging was the more time consuming part as I had to clean the flowers of their leaves and then arrange them.  I realize you all know from previous posts how much I love flower arranging but I still have to share :)
And it's complete!  I wish I had gotten a picture of it on the table but I forgot to take a photo shoot of it all set up.  I was happy with the way it came out and can't wait to explore more ideas for filling the area between the two vases.  I also saw it with red hots and heart candies for Valentine's day.  Stay tuned for more arrangements using this concept.
Next up baking.  I also made carrot cake cupcakes with cream cheese frosting.  I absolutely love carrot cake and think it should be a staple for every Easter feast.  I wasn't exactly sure how I was going to decorate these but figured I would come up with something.  If I had more time I would have researched some ideas but this is what I came up with.


I also frosted some of the cupcakes with green frosting and stuck a peep and jelly beans on top of each one.  Those ones were hard to get in the boxes without making a mess.  I bought the boxes at HomeGoods and they were the perfect carrier for the cupcakes.  At the end of our brunch each family took home a box of cupcakes since we were all too stuffed to eat one during the day!
How cute are these boxes?!  Ok enough of the Easter talk - I mean come on that was over yesterday.  I look forward to the weather getting better and being able to share my flowers with all of you. 

Until next time...Stay Creative!!


Tuesday, April 3, 2012

Sweet Eggs...

Ok I am back - I was on vacation for the last week and a half but now that I am back I am ready to blog!  I want to share with you a project that I completed with my mom.  I say completed because she did the hard part and I was able to do the fun part:)  As a kid my mom made sugar eggs so she decided to try them again.  I am not positive how she made the actual sugar egg but here is a recipe from the internet: http://candy.about.com/od/sugarcandy/r/sugar_eggs.htm

My mom used egg forms with two halves that were supposed to hold candy.  Once she filled the eggs with the sugar substance she let it harden then scooped out the center of each egg.
When I came home for the weekend my mom had four halves waiting for me.  Here's a close up:
In the bottom half is where you create a scene so once the halves are together you look through the hole.  My mom purchased some chicks, Easter grass, and robin eggs for the inside.  It was difficult to find the small figurines but if you keep your eyes and your ruler out at the craft stores you will find the right figures!
I added a dab of hot glue on the bottom of the egg and stuck the Easter grass to it and then glued the chick and the robin eggs.  Next I hot glued the the top to the bottom and it was one piece!  You can also use frosting to hold the eggs together but hot glue seems to work better and I highly doubt anyone would want to eat these after Easter!
Here they are pre-frosting.  Next you need to make the royal frosting to decorate the eggs.  It is important to use royal frosting as you need frosting which completely hardens.  Regular frosting will not harden enough and will get damaged in transit and will be a mess when kids are trying to look through them.

We decided to use blue coloring but you could use any color or multiple colors!  Now it was time to frost the egg.  After a quick instruction from my mom I was ready to decorate it.
First I put frosting around the egg where the seam is for the two halves and then decorated the front.


As you can see the frosting is great to hide the seams and the jagged edges of the sugar eggs.  You can even get a little more fancy and create designs and flowers.  I have not mastered frosting flowers yet but I will get there!  These may not be the best project for kids but they are great to give to kids.  If they are careful enough then these can be used each year.  More projects to come!

Until next time...Stay Creative!!


Tuesday, March 20, 2012

Ice cream season...almost

Over the summer I received a ice cream cone cupcake pan - a what you ask??  It is a pan that has molds for the top and the bottom of a cupcake.  One night I was feeling adventurous and decided to give it a try.  On the back of the pan box was a recipe for a pound cake which I decided to follow as well. I filled the first 3 bottoms and tops and they were ready to bake.
I also added sprinkles to the top as suggested by the recipe.  I set the timer for 50 mins and realized I was in for a long night if I wanted a dozen of these!  I waited and waited and waited until the buzzer went off.
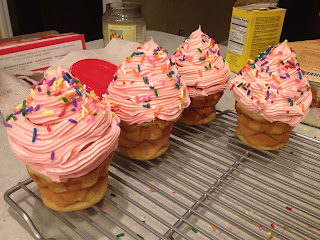
I also realized after the first batch the reason you use the pound cake recipe is because the tops are so heavy the base needs to be sturdy enough to hold the top.  Once these cooled off they were ready to be frosted.  I put a drop of frosty between the top and bottom as glue and frosted the top. 
They look pretty good and actually like ice cream cones!  These are not made for one person - they are probably large enough for two people.   They were very time consuming since the batter took a long time to bake all the way through and was hard to judge when it was ready.  After baking all the batter I realized next time I would use regular cupcake batter and no tops.  I will also use frosting as the top and not add a baked top.  By using only frosting on the top these would also be manageable for one person to eat!
I also made some cookies for the holiday this past weekend.  My mom gave me the cookie cutters and with some sprinkles, sugar cookie dough, green dye, and a festive plate they were all set to share at work!
YUM

And finally I am ready to share my painted bathroom with you all but first here are some before pictures.  Our bathroom was a cream color with blue tiles - I am not the biggest fan of blue but since the previous owners were I have learned to like it. 
The first picture is from the door and the next is looking from the toilet to the shower.  As you can see the color scheme is blue, brown, and cream.  I really like green though so I decided to pick a color which is more of a khaki color.  I wanted to choose a color that would bring out the tan in the tiles.  After bringing home more than 20 colors I finally found the one!  After convincing my husband that I could paint the walls and only the walls I was determined to paint it in one weekend.  I started on Saturday and finished on Sunday! 
I was now ready to pick the new shower curtain, pictures, bath rug, and tissue holder.  All the items I replaced I had in the bathroom for a few years and were starting to look a little ragged.  After a few trips to HomeGoods I am ready to reveal the new bathroom. 

There doesn't seem to be a huge difference in the paint but if you look at the trim you can tell there is a difference.  I know I have said this before but I really like green so I am glad I was able to pull the green in.  I am not completely satisfied with the hand towels but for now they work.  I hope you all enjoyed my home DIY project...stay tuned for more.

Until next time...Stay Creative!!


Monday, March 12, 2012

Let's tie one on

The other night I was invited to a get together at a friend's and naturally didn't want to go empty handed so I thought about what I could bring.  I knew she would have a lot of food and so I didn't want to bring something I made and defaulted to the standard bottle of wine.  Who doesn't love a bottle of wine - I know I enjoy when people bring bottles of wine to my house.  Then I thought about how could I make it a little more thoughtful then just a bottle of wine...of course a wine tie!  You have all heard of a wine tie, right?  That's what I thought so here comes the wine tie lesson.
First you start with some ribbon, floral wire, and some sort of adornment.  I had plenty of flowers I bought to top my Christmas presents so I decided to put one to good use.
The ribbon was left from Christmas too - it wasn't one of my typical dollar rolls of ribbon but it is 10 yards which you don't find too often.  Next I made a ribbon with the bow.   Make sure the ribbon you select to use has wire or else you will have one floppy bow. 
Two more loops to go.  Once I had all the loops I tied wire around the center and made sure it was tight enough to secure the bow.  Next I took the flower and curled the stem around a pen or pencil so that there are no sharp edges.
Now that the bow and flower are all set I put the bow in front of the stem below the flower and secured it with the wire.
I then cut a small piece of thinner ribbon long enough to tie around the neck of the bottle.  It doesn't matter what the ribbon looks like as it is hidden by the bow and flower.  I used a dark purple ribbon since that was what I had but anything smaller will do.
I cut the excess floral wire and tied the purple ribbon around the neck of the bottle.  This is a great way to turn a bottle of wine into a more thoughtful gift and it takes no time to do.  I was thinking about it earlier and you could also tie a cookie cutter on it or a wine stop to the ribbon as well.
The finished product - these were all things I had hanging around the house however I know most of you probably don't have this stuff.  If you keep your eye out for ribbons and floral picks on sale at craft stores you will be all set next time you need to bring something to a friend's house.

Until next time...stay creative!!


Wednesday, March 7, 2012

Somethings Borrowed..

My dad likes to send me pictures of projects my mom does at home, as a friendly competition so I thought I would share the latest.  Unfortunately I can't tell you how to make these things since I have only seen pictures but either way they are pretty great.  When I told my mom about the wreath I made last weekend she said she had a wreath as well but she didn't share the details until my dad sent the picture.  I will have to say I am a huge fan of the wreath.  It is green and if I haven't told you yet I love green!
I like the nest - it is a nice spring touch!
Later that evening she prepared a Martha Stewart like dinner although I will be honest I have yet to hear how it tasted but I am willing to bet it was delicious.  I don't have a recipe but she is sharing it with me this weekend so I will definitely share it after the weekend. 
She raves about the potatoes so I can only imagine how great they are.  My mom is a really good cook and always prepared a home cooked meal each night when we were growing up.  I strive to be able to do that as well once we have a family so we will see.  Maybe I will still be blogging and sharing meals!
My last something borrowed is a recipe (no picture) and one of the best things to ever hit my tongue.  A few weeks back my friend brought over these cookie dough balls which we put in the fridge and forgot about until the next morning.  My husband and I each had one and it was love at first bite!  During the week we each had some and by Thursday I decided I had to make them for work.  With any luck there would be leftover to take home for the weekend - and there were!  These are so simple and everyone loves them.
I actually only dipped half of each ball in the chocolate and now reading all the directions it looks as if it says to dip the whole ball - oh well.  Also my husband loved them but made a comment about a different taste and then talking to my friend she thought it was odd you used baking soda.  We think the baking soda is to add to the authenticity of it tasting like real cookie dough but I think next time I will leave it out!
This past weekend I painted the bathroom - stay tuned to before and after pictures.  Also I still have that project to share I told you about almost two weeks ago...shame on me but the St. Paddy's day shirts got in the way.  Next on the list is a fruit tart...if I don't mention it again that means it was a flop!

Until next time...Stay Creative!