Monday, May 21, 2012

Chicken, Lickin' Good!

I shared with you all a photo of a chicken dish my mom had prepared a month or so ago and promised to share the recipe.  Well I have had the recipe for a while now but wanted to wait until I made it to share it with you all.  My mom promised it was delicious but I actually hadn't tried it until now!  The picture on the recipe looks very involved and the outcome looks absolutely gourmet but I want to let you know it is not as complicated as it looks.
First I bought the chicken - the recipe calls for an organic 3 1/2 pound chicken and I wasn't sure how easy this would be to buy.  Well I walked away with a 7 pound whole chicken and after telling my mom I realized finding a smaller, whole chicken is difficult.  Once I had the chicken and the rest of the ingredients I was ready to go.  I made this on a 'school' night (aka midweek night) so you can take my word it doesn't take all day!
The recipe also calls for fingerling potatoes but my mom brought me some smaller potatoes that were different colors.  Have you ever had the Jet Blue Terra chips well that type of potato was in the mix and very tasty.  I am not sure how easy these are to find but if you can find them they are great.  I think they were called a potato medley and came in a bag.  Once I basted and stuffed the chicken with a lemon it was ready to bake.  I would caution that if you get a larger chicken I would stick to the cook time based on the weight of the chicken and not this recipe.
Once the chicken is done cooking you brush on the sauce you will make while the chicken is cooking then let it set and voila dinner is ready!  This chicken was huge and we had leftovers which always makes the next night really easy :)
I served it in the dish I baked it in as it was just me and my husband eating but when I cook this again it will be for more than two of us and I will make sure I serve it on a nice dish.  Overall it was very tasty and moist - the sauce really brings out the flavor.

Also I wanted to share with you a picture of my garden that I mulched yesterday.  The garden started 3 years ago with a few small hostas and a hydrangea and has grown into a jungle!!
I also recently received the bunny from my mom which I love!  I think with a nice bird bath I will have the perfect backyard, city retreat.  Stay tuned for another easy recipe I made this weekend.


Wednesday, May 9, 2012

More Flowers

This week I went to a flower class and had no idea what to expect.  I had come across the flower school online and so for my birthday I received a gift certificate from my parents for two classes.  This was my first class and I wasn't sure how exactly it was going to go since the website had the course name but no description.  The class I choose was called 'Flowers & Foliage' - what does that mean?  I wasn't sure either but now I know.
When I got to the class I saw hydrangeas (yay) and lilies (nay) and still was not sure what we were doing.  We all started with the instructor showing us examples of what she made with the materials and then we were left to work on our own.  I wish I had taken pictures but there were signs asking for cellphones to be turned off so being the good student I am I didn't want to get a bad rap! 
We started with wrapping the container they gave us with big leaves using these sticky dashes - these were extremely sticky and the leaves are holding strong.  The containers were black and silver so the leaves did the trick.  I was given two leaves and one was so big it was wider than the container but I made it work.  Next we put in the wet block and covered the diameter of the container with lemon leaves.  We then used one hydrangea to cover the bottom and built up from that.
The instructions were to use two stems of lilies and place them any way we wanted to and then we had some grass and these hollow green twigs that looked like bamboo (I forgot the name).  In the beginning the instructor demonstrated that these bamboo like stems could be formed any way with wire and they don't break.  However once you bend them the crease is permanent.  I wasn't sure what to think as I am used to several flowers in bouquets and this was very contemporary.
Once we were done the instructor judged each one but wasn't ruthless about it.  Some people in the class loved giving their opinions on all of them whether you wanted to hear it or not! 
I struggled with this arrangement a bit because it was contemporary and I didn't want it to be too symmetrical and in the end it worked out just not sure how I like it.  And here it is:
and another view...
As you can see it takes on a different look from a different angle - this was something I was really aiming for.  It is definitely not your typical arrangement but it is growing on me! I did want to let you know that one arrangement had the bamboo stuff sticking out each side and the instructor referred to them as bunny ears...ooops.
I also wanted to share with you a gift I recently wrapped.  I particularly like this one since it is so different.  I found peacock feather wrapping paper at TJ Maxx to start the pakage.  Then I was strolling in Michael's the same day and thought a peacock feather would be nice and they had them!  I used to some green ribbon I already had and voila I had a pretty package!
My mom was visiting this past weekend and used the paper too!  It is so fun and different - perfect for any occasion. 

Until next time...Stay Creative!!


Wednesday, May 2, 2012

Easy, Peasy, QuichE!

Recently I went to a friend's house and decided with another friend to bring lunch.   It was very last minute so I wasn't sure what I would make until quiche came to mind.  I had actually never made quiche before but after googling a few recipes I realized there were several different variations to the quiche recipe.  I found one that I decided I would use as a guide for my first spinach, cheese quiche.  First I started with sauteing onions with butter then added garlic and sauteed some more.
Next I defrosted the frozen, chopped spinach in the microwave.  I then removed the onions and garlic from the stove and put them in a bowl to cool.  Once the spinach was defrosted and drained I added the spinach to the onions and garlic and mixed it well.
The recipe then called for Gruyere cheese - I had never made anything with Gruyere so I wasn't sure what to expect.  When I got to the grocery store I realized I needed 1 1/2 cups shredded and the cheese was on the expensive side.  I had no idea how much a block would be grated but I learned that a block of cheese grates into a large amount!  I grated the cheese and added it to the spinach mixture.  I also added cheddar just because I had some.
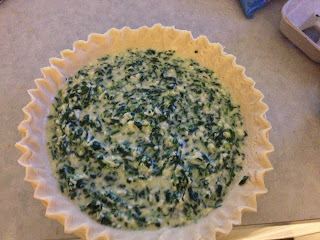
Once this was combined I used my hand mixer to beat the eggs and milk.  Once the eggs and milk were well blended I added the egg mixture to the spinach.  The recipe says to put the spinach on the bottom of the pie plate and add the egg but I wanted to make sure it was all blended.   Prior to adding the mixture to the pie dish I 'made' the crust.  By made I mean I bought a Pillsbury pie crust in the refrigerated section at the grocery store.  I have made crusts a few times from scratch but for quiche this was pre-made crust was perfect.  
As you can see the filling didn't quite fill the dish.  I forgot my pie dish is a deep dish so next time I make the quiche I will just need to add some more eggs and milk.  I put it in the oven and waited...
Voila...
It is ready to eat!  The great thing about this recipe is you can add anything you want for the filling - just use the egg and milk base add your imagination and dinner is served. 

Spinach Quiche Recipe:
1 tablespoon unsalted butter
1/2 onion, finely chopped
1 clove garlic, minced
1 10-oz. package frozen chopped spinach, thawed and squeezed dry
1 1/2 cups grated Gruyère
1 9-inch unbaked pie shell
3 large eggs, lightly beaten
1 1/2 cups milk
Click to see savings

Salt and pepper
Pinch of ground nutmeg

  1. Preheat oven to 375ºF. In a small skillet over medium heat, melt butter. Add onion and sauté until translucent, about 5 minutes. Add garlic and cook for 1 minute longer, stirring. Transfer to a small bowl and let cool.
  2. Sprinkle onion mixture, spinach and Gruyère over bottom of pie shell. Beat eggs and milk together, season with salt, pepper and nutmeg. Gently pour into crust.
  3. Bake quiche for 40 to 45 minutes, until set and nicely browned. Remove from oven and let rest for 10 minutes.

There you have it - try it and I promise you will not be disappointed on how easy and good it tastes!

Until next time...Stay Creative!!