Sorry I have been away the past few days but I have a great post today! A few weeks back I decided to take flower classes - I wasn't sure where but using my best friend Google I found a few places. I signed up for a Thanksgiving arrangement class which is next week at Boston Center for Adult Education and then I received an email with an offer to get one class at half price at Twig later that week. I saw it as a sign and carpe diem kicked in. I bought it right away but wasn't sure when I would use it. On a whim Friday I signed up for Saturday's class which focused on hand tied bouquets. When I got to the flower shop this is what I saw:

(heaven)

(more heaven)
The concept of the shop is that the customer can come in and see all the available flowers. There is one typical cooler which was very small and had tulips and roses in it. I was shocked by all the flowers out on the table. The instructor informed me that the website was wrong and I was actually crashing another class (a more in depth, more expensive class) but I was welcome to stay. I was so excited to attend the better class. After waiting a few minutes the other two participants were no shows and I had a private class! The class was designed to go over long and low table arrangements, tall vase arrangements, rose arrangements, and hand tied bouquets. After a history of flowers the instructor took me around the table and told me about every flower there. I thought I knew flowers - I was wrong. We both connected right away on our shared dislike for carnations, however the flower shop does carry one type of carnation!
Long and Low Arrangements:
We started with wet block and greens as filler (at this point I had not asked if I could take pictures so not many pics of the process) and then just added flowers here and there. His biggest instuction was not to be symetrical and put flowers where ever. I also learned it is best to put smaller flowers in clumps of three or more.

You can see there are clusters of red spray roses and an orchid. The orchid is actually fastened to a pick as the stem isn't long enough. Low arrangements are typically used on a table for an event or dinner so the flowers really only need to be good for the day/evening so the orchid will be fine for the day. By adding more greens to the side you can give the affect of the arrangement being longer. Next up tall arrangements.
Tall Arrangements:
This arrangement had a very rustic theme. During this session I was told that when you do a tall arrangement the flowers should be double the height of the vase. Not always possible but a good rule of thumb. You also need to be aware of the diameter of the vase so you don't get over zealous and can't fit the flowers in.

First a leaf was added to the vase - I love when leaves are in the vases I think it gives a polished, vibrant look. Waxy leaves are best to use because they repel water and won't decompose.

Then the arranging began with willow, sunflowers, mushrooms and more!
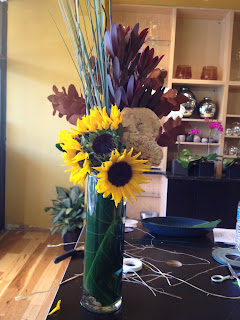
If you look at the sunflowers closely there is one without petals. The instructor removed the petals which I think really gives it character.
Rose Arrangements:
I am not a huge fan of roses but this shop had so many varieties and colors there were some I could really learn to love. The instructor showed me a very simple rose arrangement that can be used for the holidays - very simple but elegant.

Wet block in a simple silver container.

Almost there.

Final product - the instructor added a few rose stems and wire to give it more dimension.
Hand Tied Bouquets:
This was the class I originally signed up for and my favorite part mainly because I will be able to use this again. The instructor made his own first and then let me have two buckets of flowers and told me to get to work. It was like my final exam and I think it turned out pretty well!

First you have to hold the flowers lightly and let the flowers lay against each other at an angle (this was new to me).

Once it is complete you can use floral tape to secure the top and bottom of the stems then wrap it nice and tightly! Now if this isn't your thing then you can cut the stems and put it in a low vase.

How neat and simple is that. Now it is my turn!

This was the bouquet I made and was able to take home. I hand tied it just for the challenge and then removed the ribbon to put it in a vase. I tempted to cut the stems and put in a low vase. I mentioned carnations earlier and how much I dislike them well there are carnations in the hand tied bouquet I made. Do you know which ones are carnations...the green ones! How great are these carnations?? They add so much texture to the bouquet.
All in all I had a great class and absolutely loved working with Rob at Twig. It was such a great experience and I would love to do it again. Some key things I learned:
1. You need to change the water for bouquets daily to avoid bacteria (this seems so obvious but I didn't know it was daily).
2. In order to keep hydrangeas fresh in a vase you need to cut their stems diagonally and place them in hot, hot water from the faucet. This was the best tip because they wilt so easily so as soon as you see that you need to cut them and put them in hot water and they will be like new.
3. You want the wet block to soak up the water on it's own - if you run the faucet over it or force it in water you will block the holes and no water will get in the middle.
4. If you push a flower in the wet block too far you need to remove it and make a new hole to ensure the flower is getting water.
5. Not all carnations are bad!
The place also does parties that you can bring your own adult beverages to - how awesome. That is all for now but if you want more information go to: www.twigboston.com and ask for Rob!
Until next time...stay creative!
No comments:
Post a Comment