A few things before I get into the main blog topic...roman shades. Last week I told you all about the arrangement I made at the flower class which I was not the most thrilled about due to the flowers that were provided. Well I had a bouquet of flowers at home from the weekend that I needed to use or else throw out as we were traveling so I put them to use. I added a few more lemon leaves, some roses, a cabbage, and pumpkin garland to make the arrangement more up to my standards.

I used a few tricks I was taught at my first class (the class I really liked) and opened the petals of the cabbage for a fuller look.

This is the final arrangement after I added a few flowers and decorations - not too bad considering what I started with.
Next I want to share with you what I did with the turkey pops. My mom suggested I make these for the kids coming to our house for Thanksgiving so that is what I did. My mom made these adorable cones to hold candy including my turkeys. She then hung all the cones from a tree branch she found outside and when I arrived I added my turkeys.


So there you have our Thanksgiving tree!! The kids loved the pops and candy but the best part was they made the cones into hats. I helped them by lengthening the ribbon.
Now onto the main event...roman shades!! A few weeks back my future sister-in-law sent me a link on how to make no sew roman shades that she was going to attempt. I loved the look of them and knew I had to try it. All our windows have blinds but the kitchen window does not have blinds so this would be the perfect 'test window'. While I was home this weekend I bought fabric and was ready to go. When I got home today I removed the blind and started the project by first laying the blind flat on the ground:

Next I needed to remove the thin cord which keeps all the blinds equally spaced, not the thick cord running through the blinds:
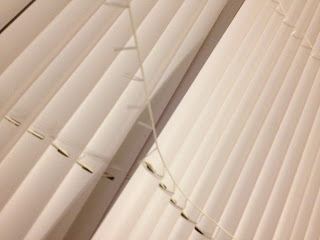
Once the thin cords were removed it was time to make the thicker cords the right length. The window is 42" long so I decided to make the shade the same length. I had to remove the plugs on the bottom blind and cut the cord to the right length as well as remove the excess blinds:

Since the length was 42" I decided to space each blind by 6" and kept 6 blinds on the shade:

The shades look so bare! Next I needed to ensure the fabric was the right width and length. I used iron on hem tape for the sides to create a straight edge on each side. The length was perfect and did not need to be hemmed:

It was the right width once hemmed and was now time to equally space the blinds. The original directions used tacky glue but I used a hot glue gun to secure the fabric to each blind as well as to the top and bottom of the shade:

After securing the bottom of the fabric to the base of the blind it was time to hang the shade and try it. I was a bit nervous not knowing want to expect but here it is:

I was happy with the way it turned out but it definitely takes a bit of practice before mastering it! If you want more detailed instructions this is the website I followed:
I will leave you with this last bit. On our way home today we stopped at HomeGoods and I
'adopted' a green sparkly reindeer to add to my Christmas decorations. I picked him up and handed him to my husband who asked no questions and brought him to the register so I could pay. I guess my husband is either completely staying out of my decorating madness or knows it is better now to ask questions.

Next week when I unveil our first tree as a married couple this little reindeer will fit right in!!
Until next time...stay creative!!
No comments:
Post a Comment